

Here I will show you, how to make a powerful amplifier using C5200 and A1943 transistors. I used 3 nos C5200 NPN and A1943 PNP transistors each of which I will connect each other in parallel. A combination of C5200 & A1943 amplifiers is widely used for high gain.
Volume, bass, and treble controllers are also attached for more control of sound frequency. The MP3 player kit is also attached which allows users to use a USB device, memory card, and mobile. I demonstrated the circuit with 12 volts DC from a PC power supply of 5 amperes but you can use 12 volts to 18 volts DC. I used 4 ohms 120 watts speakers which provided a greater sound.

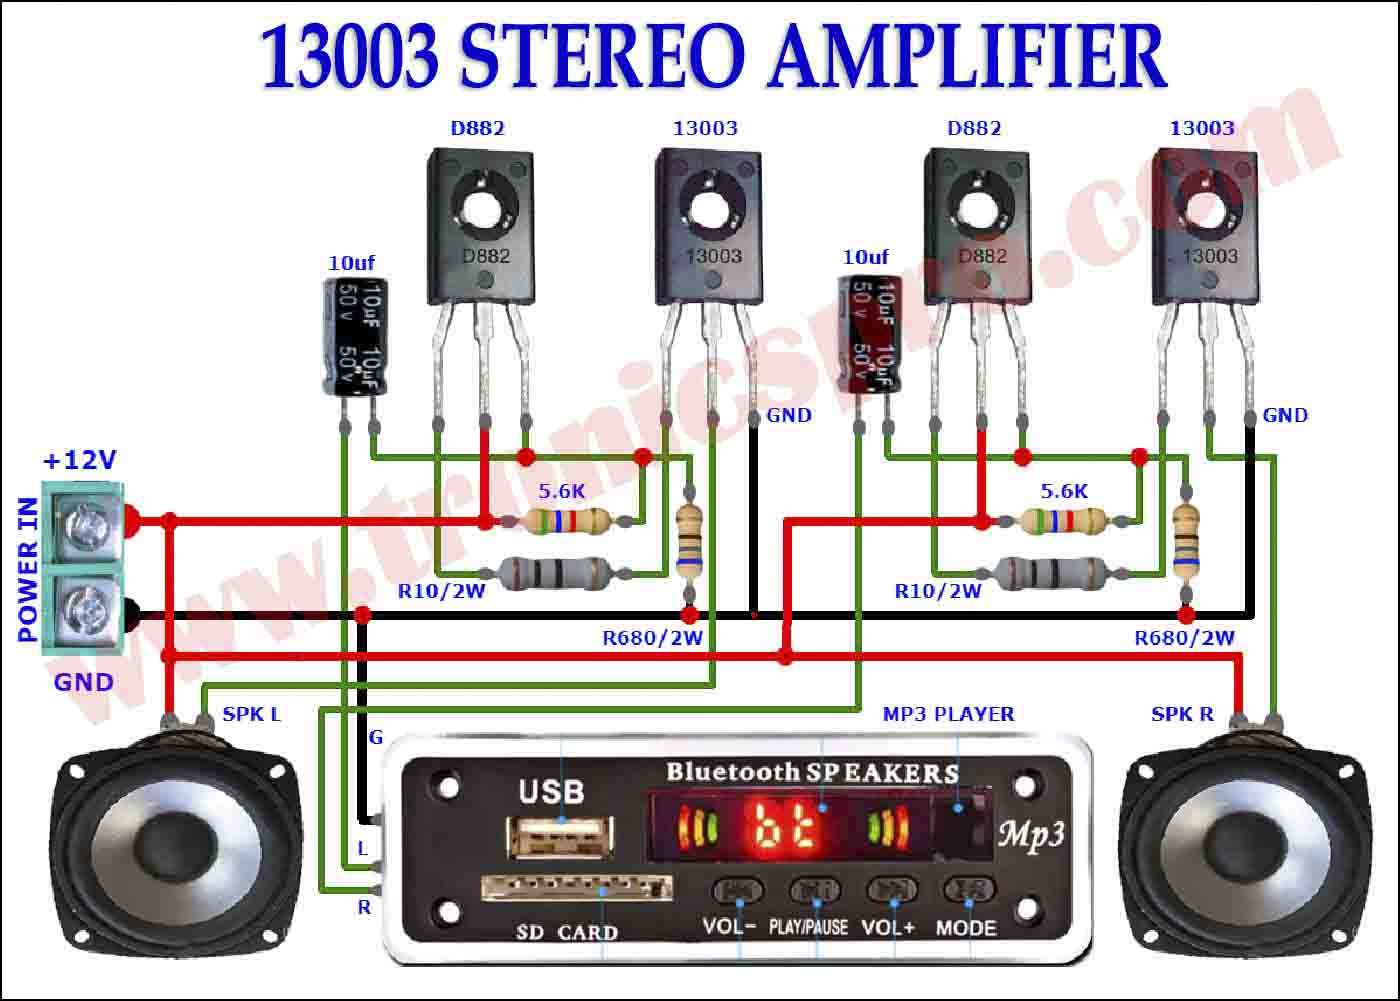
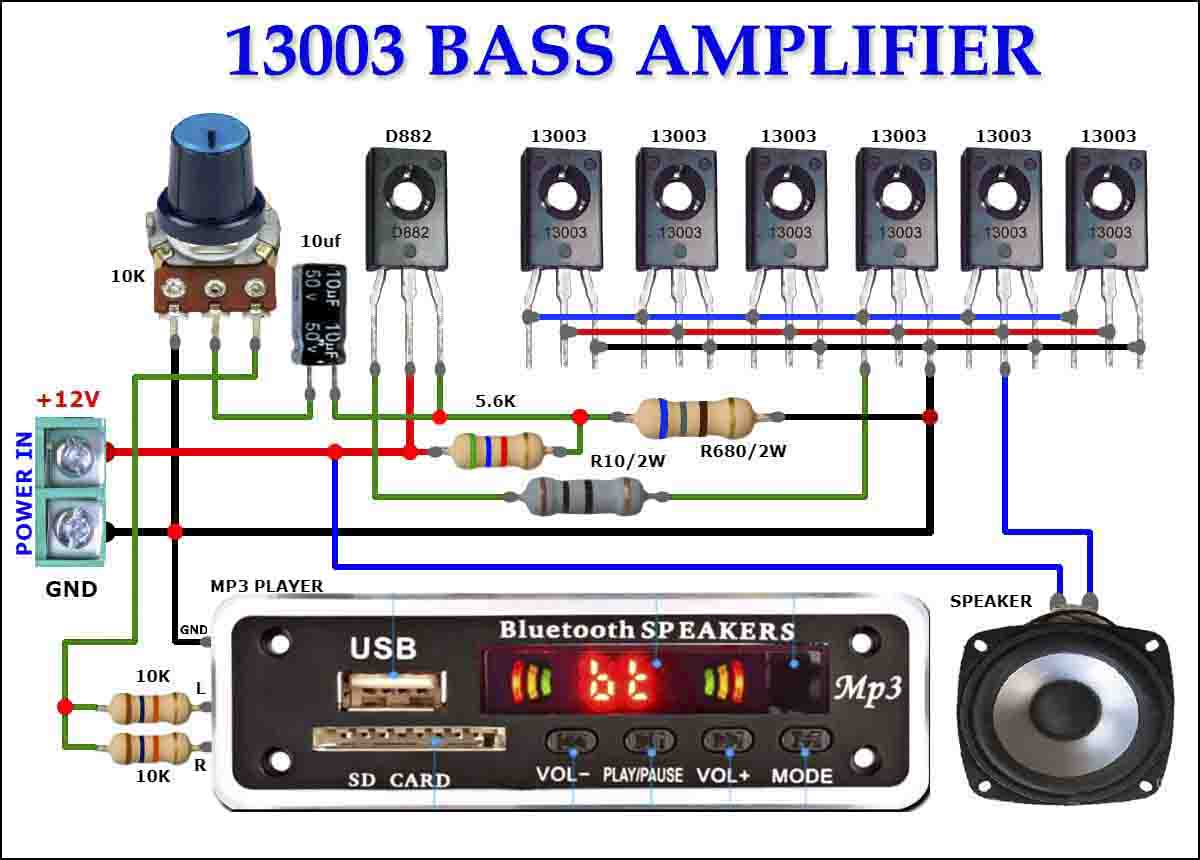
Circuit diagram
used in C5200 A1943 amplifier
The following circuit diagram contains powerful C5200 A1943 amplifiers and volume bass treble controllers.


List of components
used in C5200 A1943 amplifier DIY
- 2SC5200 transistor x 3
- 2SA1943 transistor x 3
- 2SC2383 transistor x 1
- 1N4148 diode x 2
- 4700uf capacitor x 1
- 220uf capacitor x 1
- 104 capacitor x 4
- 680 ohms / 1-watt resistor x 1
- 100k ohms resistor x 1
- 1k ohms resistor x 3
- 2.2k ohms resistor x 2
- 50k potentiometer x 3
- MP3 Bluetooth kit x 1
- Power supply
- speaker 4 ohms
- Connectors and volume knobs are optional.
Development images
used in C5200 A1943 amplifier
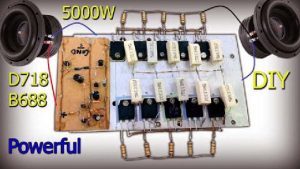
First, take a large Heat sink where 6 transistors could easily be placed. First, fix 3 transistors 2SC5200 left side and then 3 transistors 2SA1943 right side. You must use (MICA) for proper insulation. The base plate should not touch with the heat sink as both transistors have opposite polarities and will cause a short circuit.

Now join 2 diodes 1N4148 minus end with plus end. Now, one minus end solder with pin.1 (base) of 2SA1943 (right group). And the other plus end solder with pin.1 (base) of 2SC5200 (left group). Connect the collector of 2SC2383 to the center joint of 1N4148. Then solder 100k resistor from collector to base of 2SC2383. Connect the emitter of 2SC2383 to the ground at the collector of 2SA1943. Solder one end of 1k resistor to the base of 2SC2383 and the other end to 220uf positive side. Now, solder the last resistor between the base and collector of 2SC5200.

Join both groups of 2SC5200 & 2SA1943 in parallel separately and only join emitters of both groups together.

Prepare volume, bass and treble connections as per the following image. For more detail of this project click here.

Connecting input & output sources.
Take one black piece of connection wire. Join one end to pin.3 of volume control and the other end to any collector of 2SA1943 for ground. Connect one more wire of any color from the center pin of the volume control to the negative side of the 220uf capacitor for audio-in of the amplifier.

Solder power socket ground (black) wire to any collector of 2SA1943. And positive (red) wire to any collector of 2SC5200.

Connect the audio out connection positive of the mp3 kit to pin.1 of the bass controller and negative (black) to the ground. Also provide 5 volts power supply to the MP3 kit from any mobile charger or convert voltage from the amplifier 12v to 5v through a 7805 transistors.

Take one 4700uf capacitor and solder its positive end to the emitter (pin.3) of any 2SA1943 transistors. And the other negative end will be connected to the speaker’s socket. The other speaker’s black socket will be grounded.

One On/Off switch can be placed in between the positive supply in series which is optional. Plug in the power supply, connect your mobile with Bluetooth, and enjoy the music. Thank you so much for visiting this post.

More Projects and Tutorials:
Most of the content that I have been uploading on this website is related to Amplifiers. Apart from the amplifier designing and making still there are so many other amazing things that you can build using simple electronic components, Arduino Uno, Arduino Nano, Nodemcu ESP8266, ESP32, PLC, SCADA, Power generation, etc. I am going to share with you some amazing projects and tutorials from Electronic Clinic that I am sure you are going to love. Below, are links to different categories consisting of hundreds of tutorials and DIY projects.
300+ Arduino-Based Projects
Arduino + VB.Net Projects
Arduino Industrial Projects
Digital Electronics “DLD”
IoT Projects based on Arduino, Nodemcu ESP8266, and ESP32
PLC and SCADA Projects
Raspberry Pi Projects and Tutorials
and much more…
Project Video:
You may also like:
![DIY C5200 A1943 amplifier homemade]()
DIY C5200 A1943 amplifier homemade
![LA4440 bass amplifier DIY stereo homemade]()
LA4440 bass amplifier DIY stereo homemade
![C5200 Stereo Bass Amplifier DIY Volume Bass Treble]()
C5200 Stereo Bass Amplifier DIY Volume Bass Treble
![D718 B688 Amplifier DIY Powerful Ultra Bass]()
D718 B688 Amplifier DIY Powerful Ultra Bass
![D718 amplifier heavy bass controller]()
D718 amplifier heavy bass controller
![Pam8403 C5200 2.1 Channel Amplifier DIY Homemade]()
Pam8403 C5200 2.1 Channel Amplifier DIY Homemade
![PAM8403 Powerful Stereo Amplifier with Volume]()
PAM8403 Powerful Stereo Amplifier with Volume
![C5200 A1943 JRC4558 amplifier DIY homemade]()
C5200 A1943 JRC4558 amplifier DIY homemade


May mabili ba sa mga electronic parts store na heat sink? Plano ko gayahin ang ginawa mo na ito. Ok lang ba?
I’ve seen the amp building process well.
Very nice!
Can you get the following parts?
This is South Korea.
Thank you.
List of components
◾2SC5200 transistor x 3
◾2SA1943 transistor x 3
◾2SC2383 transistor x 1
◾1N4148 diode x 2
◾4700uf capacitor x 1
◾220uf capacitor x 1
◾104 capacitor x 4
◾680 ohms / 1 watt resistor x 1
◾100k ohms resistor x 1
◾1k ohms resistor x 3
◾2.2k ohms resistor x 2
◾50k potentiometer x 3
◾MP3 bluetooth kit x 1
How much amperage does the current in the power transformer use?
Hello. good morning, would you like to make an amplifier with 4 transistors being 2 2sd5200 and 2 2sa 1943.?
That is already on my channel.
48 v dc schematic single power please
Only schematic or video?
Hola buenas tardes ,saludos desde México ,elaboré el proyecto y funciona genial ,una pregunta podría agregar otro altavoz para otro canal.?
Saludos y felicitaciones.
What will be the output power of this amp? What about a pair of 2 and that of a pair.. kindly explain to me